Power BI and the Service Principal
- Rebecca O'Connor

- Aug 4, 2021
- 13 min read
Updated: Aug 5, 2021

Hello and welcome to my first Blog as the Artful Data Nerd. I cannot believe that my very first blog on this site is more technical than creative - well, lets face it - you need a great technical solution in order to realise all the creative work that has gone into designing great dashboards - so they really do go hand in hand.
So, as you can see by the title, this blog is going to go in the rhelms of authentication - using the service principal.
In the last few weeks, I have been exploring two ways in which to make good use out of the Service Principal in order to securely access power bi without needing to log in. Firstly, in order to create a service principal you need to follow the instructions below:
I used the instructions above to register an app followed by Option 2 for authentication 'Create a new application secret'.
The service principal is a great way to access Power BI resources without actually logging in as a user. You are effectively giving access for an application to log in instead - in this case the app you have just registered within Azure. By assigning the app access to a workspace, you can automate tasks outside of the interface without needing a user to log in.
In order to utilise service principals within Power BI you will need to ensure that your tenant allows this. The setting to enable it looks like this:
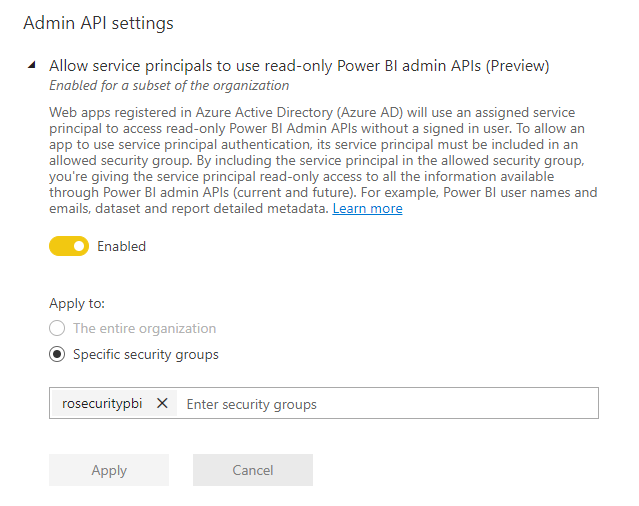
You may have noticed that I have attached a security group to ensure that principals connected to that security group will only be allowed to authenticate Power BI.
The next step is simply to give that service principal access to the intended workspace(s)

As I said, so far I have investigated two use cases where a service principal is valuable
With Premium or Embedded capacity, you will be able to leverage the XMLA endpoints to refresh content outside of the user interface with more control than the Power BI Rest API. You can choose whether to add more data or run a full refresh on specific parts of the data such as an individual table or partition. Logging in via a service principal will allow this to become a background process outside of power bi such as via data factory.
With Premium or Embedded capacity you can allow multiple users to access the same report. The service principal will be used to log into the workspace as a background process out of sight from the end user, where they simply log into the 'app' to view everything for them to see. Users do not need to be members of the Active Directory, the service principal takes control of this on their behalf.
Now those of you may be thinking - we can do this already using the 'publish as web' function - yes that is true but publish as web publishes the content for the whole world to see with no security in place whatsoever - may be good in some cases but not in most! Also many enterprises actually disable the publish to web function - just in case someone accidently exposes something that is not for the public eye! At least with a Service Principal you have control in what people see... and more importantly, what they don't.
Automating Dataset Refreshes outside of Power BI
More control while Refreshing Datasets
The Power BI interface allows both full and incremental refreshes of a dataset. However, what if you need to only refresh part of a dataset - for instance one table which changes constantly, and leave the the other tables to contain the same reference data? You may have data changing at different times, or at different intervals. It may not be performant to refresh the entire dataset every 30 minutes if the only thing that updates regularly are 1 or 2 tables.
You may also have a very large table which may benefit from partitioning, where parts of the data is updated at differing schedules. All this is achievable though the XMLA End point. You will need to enable this at the capacity level:

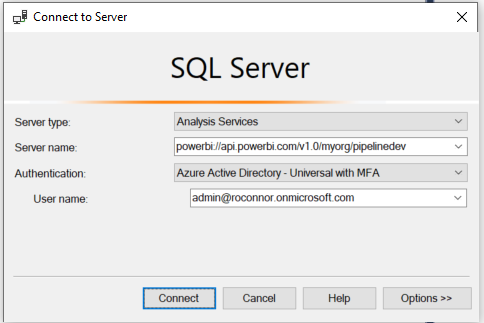
Now finally, simply publish the pbix file into the workspace. Once published, go to the dataset settings and copy the following URL:

powerbi://api.powerbi.com/v1.0/myorg/<your workspace name>;initial catalog=<your <dataset name>
You can manually create partitions and refresh them using Sql Server Management Studio.
Connect to the workspace (This is the 'Server name')

Right clicking on the table will give you access to partitions:

You will also have read write capabilities if you connect to the model using Tabular editor (Downloads - Tabular Editor)
Please Note - if you make any changes to the model outside of Power BI Desktop, you will no longer be able to download from the server to re-edit. You will be restricted to either continue to modify the model within Tabular editor, or re-publish the pbix file (where you will then loose any changes made when connected to the published dataset within Tabular editor. However Tabular editor is a great tool to manage your data models anyway, so this could potentially be a choice rather than a limitation
Automation
So now we have access to the XMLA endpoint to make changes, how do we automate this? we require the service principal in order for the 'service' to log into the dataset as apposed to a user.
Powershell has a sqlserver module, which can be used to invoke XMLA commands. Below is a link to all the availble cmdlets within the module.
You can install the module easily via the client app Visual Studio Code. I, however, decided it would be be more useful inside an Azure Automation instance. That way, you can create automation tasks in the same place as all the other data platform automation tasks - all triggered either via ADF or Synapse Workspace.
Installing the module is easy within a runbook.
Firstly, create an automation account within Azure:

NB: as we will be logging into power bi via the service principal, the azure tenant does not have to be the same tenant as the power bi tenant. This makes it very useful if there is a use case to automate the refreshing of datasets across multiple tenants.
Once the automation account is created, click into Modules and Browse Gallery Search for SqlServer then press import:

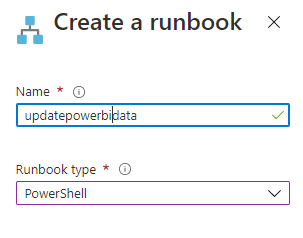
You will then be able to create a runbook. Ensure that you select the runbook type to be PowerShell
To execute the refreshes, I am using powershell commands within a runbook. I have defined the following variables:
$Partition = <the name of the partition >
$RefreshType = <the refresh type**>

$Table =  <the table within the dataset>
$AppSecret = <the secret value from the service app which you have registered>
$PWord = ConvertTo-SecureString -String $AppSecret -AsPlainText -Force
$Database =  <the dataset>
$Server = "powerbi://api.powerbi.com/v1.0/myorg/<the workspace name>"

$AppID = <the app/client id of the app registered>
$TenantID = <the id of the azure tenant - you will also see this when you register the app>

$Credential = New-Object -TypeName "System.Management.Automation.PSCredential" -ArgumentList $ROAppId, $PWord
**For more information on refresh types, please click here - Refresh command (TMSL) | Microsoft Docs
Once the variables are resolved, you will then need to process the refresh. For the exemple below, I have decided to process a partition within a table:
Invoke-ProcessPartition -Server $Server -PartitionName $Partition -TableName $Table -Database $Database -RefreshType $RefreshType -ServicePrincipal -ApplicationId $AppID -TenantId $TenantID -Credential $CredentialOnce you have saved the runbook, you can schedule the refreshes within the Automation tool.
However, what if you want to process a runbook straight after a data ingestion task within either synapse or datafactory? what if you want to parameterise the variables? or what if the the varables are driven from a previous activity within ADF?
The great thing about runbooks is the ability to use a 'webhook' to trigger a refresh from another application. In this case i will show you how this can be achieved within Data Factory.
To Create a Webhook:
In the Runbook overview slect Webhooks

Press Add Webhook and then create a new webhook. Make a note of the webhook URL as you will need this for Data Factory, once saved, you will not be able to access this URL again.

Next go to the parameters section and create a parameter. We are not actually going to be using this parameter for the webhook so you can type in anything. The parameters will be coming from datafactory.
Once configured, press 'create'.
Within Datafactory create a new pipeline.
Now we will attach our webhook to data factory. Drag the Webhook activity into the canvas.
Within the global parameters of the pipeline, create the following Parameters:

Next, you will need to create a new activity within either Data Factory or Synapse Studio.
Within a pipeline, create a new 'webhook' activity.
In settings, paste the webhook URL into the URL field.
In the body, construct the following:
@json(concat('{"RefreshType":"', pipeline().parameters.refreshtype, '", "Table":"', pipeline().parameters.Table,'", "partition":"', pipeline().parameters.partition,'","AppID":"',pipeline().parameters.AppID,'","Secret":"',pipeline().parameters.Secret,'","Server":"powerbi://api.powerbi.com/v1.0/myorg/',pipeline().parameters.workspace,'","TenantID":"',pipeline().parameters.TenantID,'", "dataset":"', pipeline().parameters.dataset,'"}') )What the above is doing is creating a json object called 'body' which will be sent to the webhook.
Now I am going to be very honest with you, parameterising for me was very fiddly, its easy to get confused between what is in a string, and what is not! I have highlighted in yellow what all the parameters are, and grey what all the strings are, this is all wrapped around a concatenate function which is then rendered as json!
This is an example of what the json looks like once the parameters have been populated. As you can see its all in the "body" part of the json:
    "url": "https://XXXX.webhook.ukw.azure-automation.net/webhooks?token=XXXXXXX",
    "method": "POST",
    "headers": {
        "content-type": "application/json"
    },
    "body": {
        "RefreshType": "full",
        "Table": "XMLA2 - FullPartitionRefresh",
        "partition": "O",
        "AppID": "XXXXX",
        "Secret": "XXXXXX",
        "Server": "powerbi://api.powerbi.com/v1.0/myorg/RefreshingFromRunbook",
        "TenantID": "XXXX",
        "dataset": "XXXX"
    },
    "timeout": "00:30:00",
    "reportStatusOnCallBack": true
}
Before this will work within the workbook, we will need to make some modifications to the script to ensure it takes the parameters from data factory and also calls back to data factory upon completion of the script.
# Set Parameters to come from the webhook data (Data Factory
Param
(
  [Parameter (Mandatory= $true)]
  [object] $WebHookData

)

#Get parameters from body - data factory wraps the json derived from the web hook activity into an object called 'body'

#Converts the json loaded into variables

$Parameters = (ConvertFrom-Json -InputObject $WebHookData.RequestBody)


#format callbackuri

If ($Parameters.callBackUri)

{

 $callBackUri = $Parameters.callBackUri

}

$Partition = $Parameters.Partition
$RefreshType = $Parameters.RefreshType
$Table = $Parameters.Table
$AppSecret = $Parameters.Secret
$PWord = ConvertTo-SecureString -String $AppSecret -AsPlainText -Force
$RODatabase = $Parameters.dataset
$Server = $Parameters.Server
$ROAppID = $Parameters.AppID
$ROTenantID = $Parameters.TenantID
$Credential = New-Object -TypeName "System.Management.Automation.PSCredential" -ArgumentList $ROAppId, $PWord


Invoke-ProcessPartition -Server $Server -PartitionName $Partition -TableName $Table -Database $Database -RefreshType $RefreshType -ServicePrincipal -ApplicationId $AppID -TenantId $TenantID -Credential $Credential

send message back to ADF to say the job is complete

If ($callBackUri)
{
    Invoke-WebRequest -Uri $callBackUri -Method Post -UseBasicParsing
}
The web hook could quite easily be a task after an ingestion task into the original source. i.e you may ingest data from the data lake to a synapse pool, which will then later trigger a dataset refresh of an individual table or partition within a power bi dataset.
I have tried two example use cases to apply the same script:
Full Refresh - I created a pipeline for each partition in a table allowing parts of a large dataset to be refreshed at different times - such as when that data is updated.
Refresh using Add. I created a pipeline to 'append' a subset of data to the table within the dataset. This extends the idea of incremental refreshes, however rather than partitioned by date (the only way to incrementally refresh in the gui), you can partition any way you like. This method does add complexity to the pipeline as you will need to build in a mechanism to avoid the duplication of data. Below is how I achieved this using sql server as a data source:

Step 1 - the lookup -
I have created a config table within sql server and made this as a dataset within ADF:

I am querying a table in sql server to find the date when the partition was last refreshed to and added one month to the date to to use as date from, and used 'Date to' + one month to be the new date to. This is to allow an additional one months worth of data
SELECT To_Date as DateFrom, DATEADD(month,1,To_Date) as DateTo from view_config WHERE Property_Type = 'D'Step 2 - Change the config using a stored procedure

The new config table in Sql server is updated. This will be used to filter the dynamic views which are being used within each partition. To make it efficient, we are using a different view for each partition to ensure that we are making used of the indexing within sql server rather than filtering on views. This made the refresh perform much quicker.
Example view for detached houses partition- relying on the updated config table to filter the view. Ian Pike (ian.pike@microsoft.com) gave me some handy hints in how to do this - as I am not a super expert on creating these sorts of views.
CREATE VIEW [dbo].[DETATCHED] AS

SELECT * FROM [dbo].[hprices003]
WHERE Date_Of_Transfer >  ( SELECT From_Date FROM [dbo].[view_config] Where [Property_Type] = 'D')
AND Date_Of_Transfer <= (SELECT To_Date FROM [dbo].[view_config] Where [Property_Type] = 'D')
AND Property_Type = 'D'
Partition 1
let
    Source = Sql.Database("mydatabase.database.windows.net", "houseprices", [Query="SELECT * FROM [dbo].[DETATCHED]"])
in
    Source
Partition 2
let
    Source = Sql.Database("mydatabase.database.windows.net", "houseprices", [Query="SELECT * FROM [dbo].[SEMI]"])
in
    Source
NB: you may experience performance problems in the long term if data is continiously appended, therefore, I recommend to either schedule in a full refresh or data + recalc refreshes during 'quiet' times.
Embedding Reports into Externally facing Apps
Service Principals are really useful if an externally facing app is used and power BI reports need to be embedded securely without the need of membership to the active directory.
I tried this out using the following sample as a starting point:
The framework I chose was Python, only because that was the language I am most familiar with. It was pretty simple to setup as all the configurations are contained within one config file.

So it was very quick to experience embedding a report into a sample Flask App using the service principal.
However I wanted to take it one step further and add authentication to the app. I am not an 'App' developer by trade - I tend to prefer the low/no code approaches in life. However, Myself and a colleague of mine (liping.huang@microsoft.com) used a flask sample authentication app and combined it with the existing power bi sample app. It took a bit of work, as neither of us were experts in Flask, however after a bit of research we managed to create an app where we register as an user to log in to then reveal the power bi report which has been automatically authenticated by the service principal.
But what if the data needs to change based on the user who logs in? My first research was whether or not we could apply row level security to the service principal- basically treating it as a user - and perhaps having a different principal for each role??? did that work?? no! And that is not how its meant to work either.
Although the service principal lets you access the report within a workspace, what it doesn't to is work with Power BI's Row Level Security. However there is a correct way to achieve this by inferring a 'username' and assigning roles to it(NB this user doesn't need to be real but it cannot be blank) I made an amendment to the config file and created a parameter called 'Username'. I then 'inferred' a username. This user can be anything you like as long as it is in a string format (it doesn't like blank we tried it!! I guess the consistent approach would be to infer the actual user logging into the app.

The next thing to do is to add roles to a power BI dataset. I did this within Power BI desktop before publishing the Pbix file.
The roles I created are as follows:

So going back to the 'username'. This becomes very useful if you want to make the RLS dynamic. For instance, you have 1 role called dynamic and then the expression might look like this:

So rather than using the username in the config file you would use the username from the actual person who logs into the app - and if it matches the 'district' value, it would reveal the data. In real life, you would probably create an 'entitlement' table within power bi containing all the usernames with the external app, and filter it that way.
Next, republish the report to Power BI. NB: As the roles are stored within the dataset, you could potentially manage these roles via the XMLA points such as SSMS or Tabular editor - or even perhaps automate it like we did with refreshing the datasets - this is something I would like to investigate further
(To be continued...watch this space....)
And within the embedservice.py file Liping kindly added 2 new functions based on the single report /workspace functions and had great fun producing the nested json required by the service as per the documentation:
{     "accessLevel": "View",
       "identities": [         {
             "username": "EffectiveIdentity",
             "roles": [ "Role1", "Role2" ],
             "datasets": [ "fe0a1aeb-f6a4-4b27-a2d3-b5df3bb28bdc" ]
         }
    ]
}RLS Function to create the json file needed to pass to the embed api
    def RLS(self, workspace_id, report_id, username_id, role_id, additional_dataset_id=None):
        '''Get embed params for a report and a workspace

        Args:
            workspace_id (str): Workspace Id
            report_id (str): Report Id
            additional_dataset_id (str, optional): Dataset Id different than the one bound to the report. Defaults to None.

        Returns:
            EmbedConfig: Embed token and Embed URL
        '''

        report_url = f'https://api.powerbi.com/v1.0/myorg/groups/{workspace_id}/reports/{report_id}'
        api_response = requests.get(report_url, headers=self.get_request_header())

        if api_response.status_code != 200:
            abort(api_response.status_code, description=f'Error while retrieving Embed URL\n{api_response.reason}:\t{api_response.text}\nRequestId:\t{api_response.headers.get("RequestId")}')

        api_response = json.loads(api_response.text)
        report = ReportConfig(api_response['id'], api_response['name'], api_response['embedUrl'])
        dataset_ids = [api_response['datasetId']]

# Append additional dataset to the list to achieve dynamic binding later

        if additional_dataset_id is not None:
            dataset_ids.append(additional_dataset_id)

        embed_token = self.get_embed_token_for_single_report_single_workspaceRLS(report_id, dataset_ids, username_id, role_id, workspace_id)
        embed_config = EmbedConfig(embed_token.tokenId, embed_token.token, embed_token.tokenExpiry, [report.__dict__])
        return json.dumps(embed_config.__dict__)
Generate the Embed Token
 def get_embed_token_for_single_report_single_workspaceRLS(self, report_id, dataset_ids, username_id, role_id, target_workspace_id=None):
        '''Get Embed token for single report, multiple datasets, and an optional target workspace

        Args:
            report_id (str): Report Id
            dataset_ids (list): Dataset Ids
            target_workspace_id (str, optional): Workspace Id. Defaults to None.

        Returns:
            EmbedToken: Embed token
        '''

        request_body = EmbedTokenRequestBody()

        for dataset_id in dataset_ids:
            request_body.datasets.append({'id': dataset_id})

        request_body.reports.append({'id': report_id})
        # #add in username
        # request_body.identities.append({'username': username_id})
        # #add in roles
        # request_body.identities.append({'roles': role_id})
        # #add in dataset
        # request_body.identities.append({'datasets': dataset_id})

        request_body.identities.append({'username': username_id,'roles':[role_id],'datasets':[dataset_id]})
        #request_body.reports.append({'settings':{'panes': {'pageNavigation': {'visible': 'true'}}}})

        if target_workspace_id is not None:
            request_body.targetWorkspaces.append({'id': target_workspace_id})

        # Generate Embed token for multiple workspaces, datasets, and reports. Refer https://aka.ms/MultiResourceEmbedToken
        embed_token_api = 'https://api.powerbi.com/v1.0/myorg/GenerateToken'
        api_response = requests.post(embed_token_api, data=json.dumps(request_body.__dict__), headers=self.get_request_header())

        if api_response.status_code != 200:
            # abort(api_response.status_code, description=f'Error while retrieving Embed token\n{api_response.reason}:\t{api_response.text}\nRequestId:\t{api_response.headers.get("RequestId")}')
We made our 'External app' populate the role based on the 'location field' that was assigned to each app user. In this case the location field was simply North, South, East and West.
The 'view.py file was changed to include 'USERNAME' (boo in the config file) and 'location' in the embed_info area
embed_info = PbiEmbedService().RLS(current_app.config['WORKSPACE_ID'], current_app.config['REPORT_ID'], current_app.config['USERNAME'],location)Therefore if someone from the west logged in, they would only see regions within the west of the country.

The service principal is still used to actually log into Power BI, but the RLS roles assigned are governed by the external application.
Summary
So in essence these are 2 scenarios where the service principal is useful. In future I hope to flesh this out further and investigate the interaction between XMLA Endpoints and an embedded application.
I would also like to further investigate the service principal with the other APIs to for instance move Power BI content between tenants. If anyone has any requests for me to dive into then please let me know and I will do my best.
I hope you enjoyed reading my first blog!


Hi Thank you for step by step instruction, very well explained and helpful.
I have few questions.
A. after processing dataset from runbook, what if I need to send email notification for successful refresh, any step?
B. can I process dataset from SQL Server Agent like we process on prem tabular model?